General Half-Life 2/Effects
description
This is quite an advanced technique to creating huge displacement landscapes.
keywords
displacement, displacements, digital, elevation, landscapes, landscape, terrain.
This is a tutorial to create realistic landscapes based on digital elevation models (DEM) from real world places. Sample DEM and VMF included.
First step: Obtaining DEMs. There is a huge database with the entire USA country here:
http://data.geocomm.com/catalog/
Need to register (free), and downloads will be restricted at 5 kb/s, but each DEM is only 3 MB max.
You can get the first file you see, or look for a specific place. You will need to know the state and county in that case. Search is broken (at this moment), so things will complicate a bit. This is a useful service to find places:
http://www.topozone.com/
Use it to find the exact place by typing its name, then take note of state/county/USGS Quad and latitude/longitude. Now you have all you need to find your DEM. Start digging into the geocomm database, and sooner or later you should be find it.
When you are about to download, probably there will be two options: 30 and 10 meter resolution. Choose 10 meter, if there is no 10 meter don’t expect the best results.
Second step: convert DEM to Terragen format with 3 DEM.
Terragen is a nice app to create terrains with very realistic atmosferic effects (you don’t need Terragen for this tutorial). But before you can see your DEM in Terragen, you need to convert it with 3DEM
http://www.visualizationsoftware.com/3dem.html
- Load Terrain model: choose USGS DEM file type
- Can be viewed in 3D pressing F2

- Select zone can be resized pressing left mouse button while dragging on a corner. Take in consideration that DEM size is much bigger than the max distance supported by Source, so you need to crop smaller areas or your terrain will look scaled in-game. There is no problem if you plan to use it for 3dskybox.
- Export it: File/Save Terragen Terrain/ Entire or Zone, what you want.
3DEM is also capable of another interesting operation: you can merge several DEMs. If the zone you are interested is splited in two or several DEMs, will need to merge them. About merge, this is what 3Dem help has to say:
USGS 7.5 Minute SDTS DEMs in tar-gzip (*tar.gz or *.tgz) format can be directly merged by 3DEM. Choose “File - Load Terrain Model” and select “USGS DEM.” Then you can select multiple DEM files from a common directory to be merged into one Overhead View. That is, all of the DEMs to be merged must be contained in the same file directory. To select multiple files, highlight each file required using the mouse, and then click OK to load all files into 3DEM. The only limit to the number of DEMs that can be merged is memory in your computer.
DEMs to be merged must be adjacent to each other. Note that merged DEMs do not always match perfectly at their boundaries since the quality and accuracy of each DEM can vary widely. 3DEM makes the best match possible with the selected DEMs.
Please note that 7.5’ DEMs to be merged must be all of the same resolution. That is, 10-meter and 30-meter resolution DEMs cannot be mixed. Mixing DEMs of different resolution will result in an error message “DEMs Have Different Grid Resolutions.”
Please note that 7.5’ DEMs cannot be merged across UTM zone boundaries. You can check the UTM zone of each DEM by selecting “Operation - Show DEM Specs” from the Overhead View menu. Attempting to merge DEMs across UTM boundaries will also result in the error message “DEMs Are From Different UTM Zones.”
Step 3: convert Terragen to 16-bit grayscale .tif with Terraconv
We have a Terragen format landscape but we don’t need Terragen to manipulate it. Just use this little app to convert your .ter to .tif:
http://koti.mbnet.fi/pkl/tg/TerraConv.htm
Select “Load Terrain” and export it as 16-bit .tif (or .pgm, also supported by Dispgen).
Important note: there is some limitation using .tif images in Dispgen (at this moment). You must use images which size ends in even numbers.
Like I said, there is no need to use Terragen, but if you want to preview your landscape and make wonderful things with it (or create a nice 2dskybox), you definitivelly need more info about it:
http://www.terrasource.net/ (general info)
http://developer.valvesoftware.com/wiki ... h_Terragen
Render of sample DEM with Terragen:

Step 4: create your Source terrain with Dispgen
Cannonfodder’s Dispgen is an app to build complex 3d terrains in VMF format from gray scale bit maps like we have now. Download it here:
http://www.chaosincarnate.net/cannonfodder/cftools.htm
It’s very straight forward, but here are some tips:
- Brush generation parameters: mantain the proportion with your DEM, remember max size is 31000x31000. Be careful with X and Y triangles, too much resolution could result in unusable maps.
- Displacement ajustment: try with and without, maybe you will not like it
- Run smoothing: not recommended, will destroy details of our precious 16-bit grayscale.
- Create Skybox: take care with that, a gigantic map with a gigantic skybox is not the best way to make maps. More height=more BSP size and more compile time. A hand made skybox with proper height for every map zone is better (if you have large height variations)
- Create VIS nodraws: useful to make a full VIS compile, will reduce overdraw and big FPS gain could be obtained if your terrain has canyons/walls that reduce visibility. Advice: compile time can be larger than your own life if terrain is very complex.
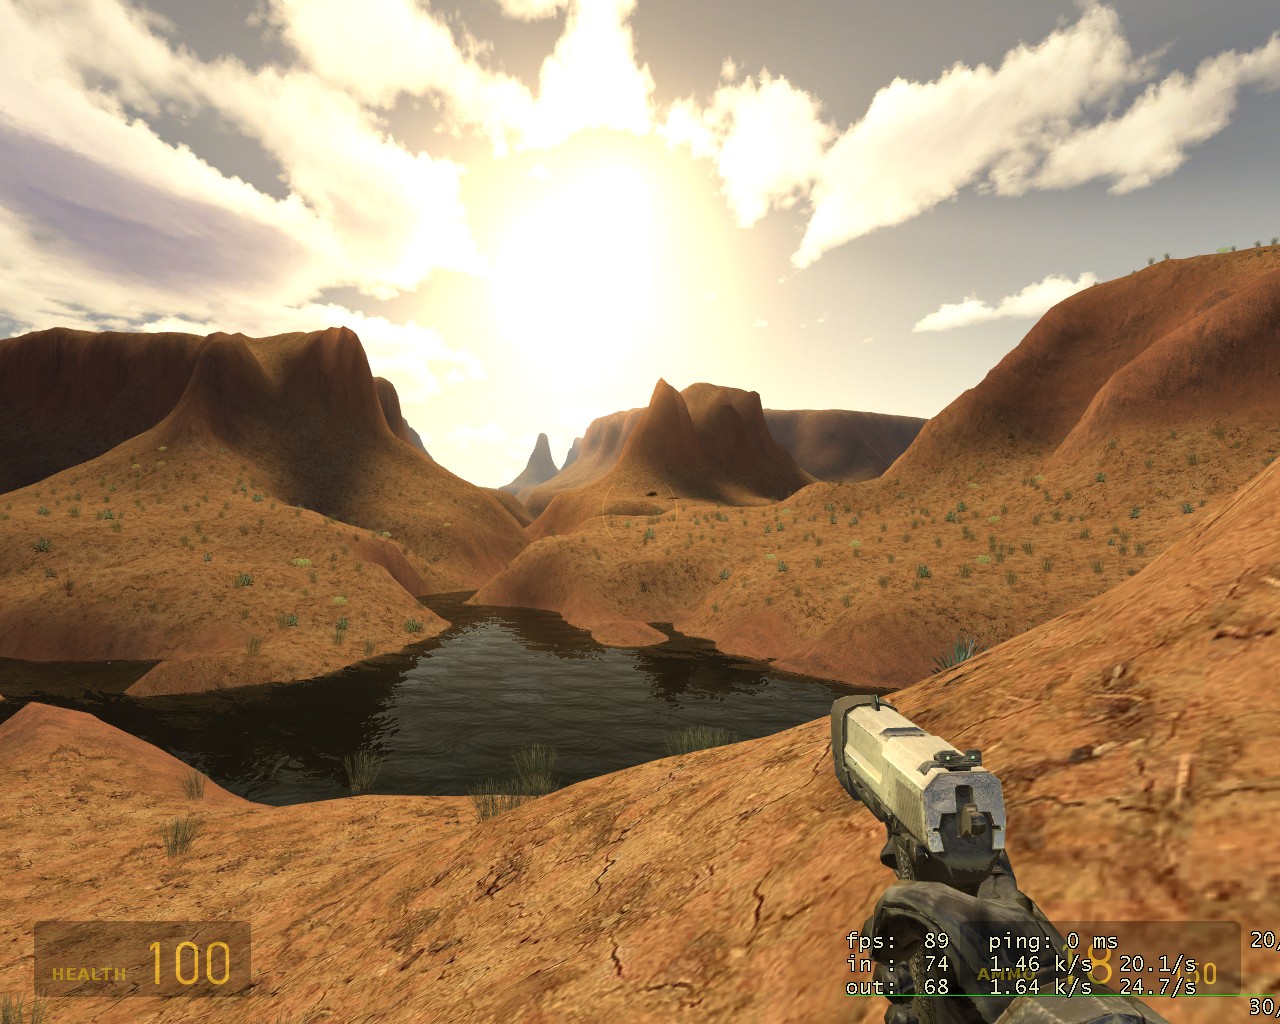
Final result:


You can get the samples I used in this tutorial here:
http://www.pcgamemods.com/14462/
R_Yell